The kitchen’s filled with a sweet-tart aroma, and I can’t help but sneak a cherry or two while prepping. Baked Fresh Cherry Pie is my go-to when summer hits and fresh cherries are everywhere.
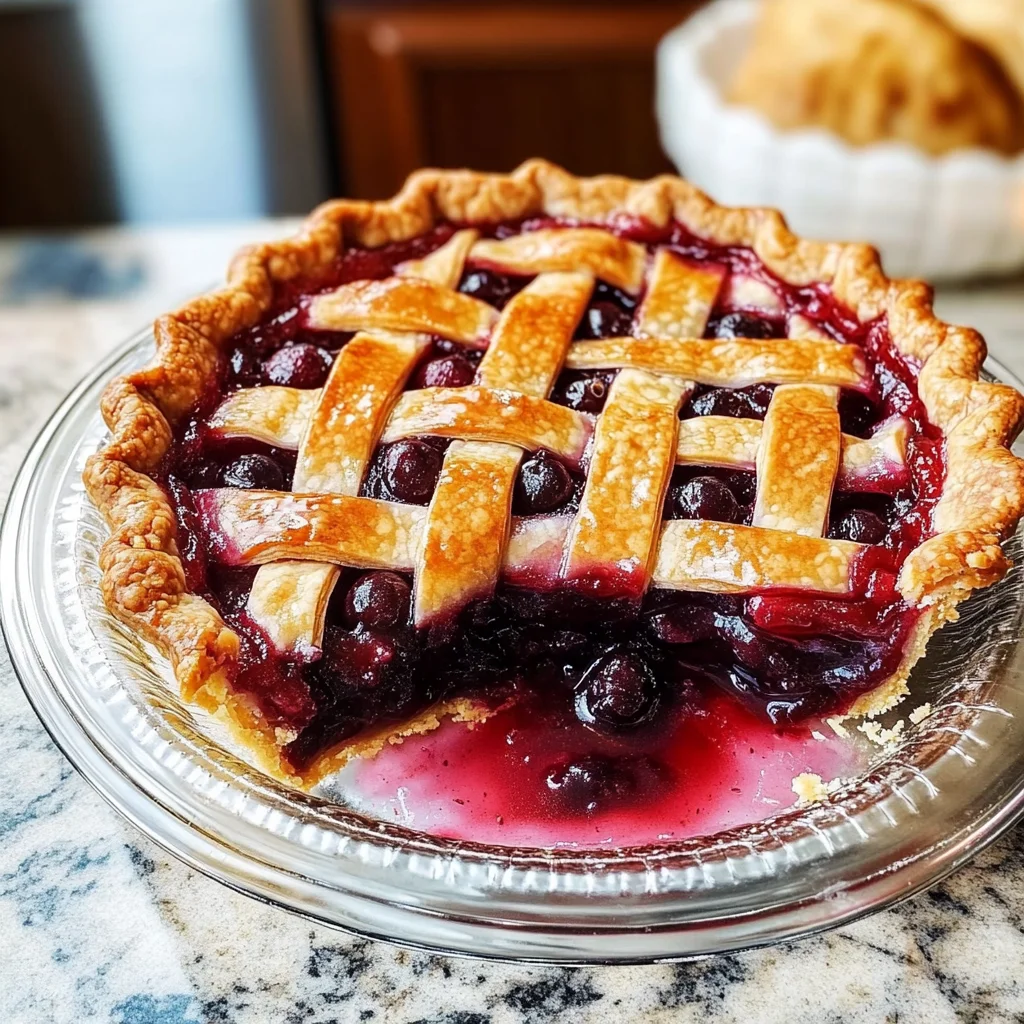
This pie’s perfect for weekend gatherings or those nights when you’re craving something special without spending all day baking. It’s got a flaky crust made with butter (trust me, don’t skimp on it) that gives it that melt-in-your-mouth vibe. So grab those cherries and let’s get baking! You won’t regret it.
Why You’ll Love This Baked Fresh Cherry Pie
- Simple Prep: It comes together pretty quickly, so you won’t spend all day in the kitchen (unless you’re like me and get distracted).
- Bright Flavor: The fresh cherries pop with a juicy sweetness that makes every bite feel like summer.
- Crisp-Crusted Goodness: The buttery crust is melt-in-your-mouth delicious, giving you that perfect contrast to the gooey filling.
- Serve It Anywhere: This dish works for everything — from casual dinners to fancy gatherings (just don’t forget the ice cream!).
- Timing Matters: Letting it cool for 30 minutes is key; if you slice too soon, it might run everywhere.
Baked Fresh Cherry Pie Ingredients
For the Crust:
all-purpose flour (2 cups) — Use a good quality flour like King Arthur, or your crust’ll be tough.
unsalted butter (1 cup) — Chill your butter before mixing; warm butter ruins the flakiness.
granulated sugar (1/4 cup) — Don’t skimp on sugar, or your pie’ll end up tasting bland.
ice water (1/4 cup) — Use really cold ice water; warm water makes the dough sticky and hard to handle.
For the Filling:
fresh cherries (4 cups) — Fresh cherries are a must; frozen’ll ruin the texture and flavor.
granulated sugar (1/2 cup) — Don’t skip the cornstarch, or your filling’ll be soupy and gross.
cornstarch (2 tablespoons) — Use fresh lemon juice, not bottled; it’ll make the pie taste flat.
lemon juice (1 tablespoon) — Always use pure vanilla extract, or your pie’s flavor’ll fall flat.
vanilla extract (1/2 teaspoon) — Add a little butter on top before baking; it makes everything richer and tastier.
For the Topping:
butter (1 tablespoon) — Brush the crust with a beaten egg for a golden finish; skip it, and it’ll look dull.
egg (1 egg)
granulated sugar (1 tablespoon)
Full measurements in the recipe card below.
How to Make Baked Fresh Cherry Pie
1. Make the Crust: In a large bowl, mix 2 cups of all-purpose flour and 1/4 cup granulated sugar. Add 1 cup of cold, cubed unsalted butter and mix until it looks like coarse crumbs.
2. Bring It Together: Gradually add 1/4 cup ice water, mixing just until the dough forms. Don’t overmix — you want it crumbly but cohesive. Divide the dough in half, flatten into disks, wrap in plastic, and chill for at least an hour.
3. Prep the Filling: In a mixing bowl, combine 4 cups of pitted fresh cherries with 1/2 cup granulated sugar, 2 tablespoons cornstarch, 1 tablespoon lemon juice, and 1/2 teaspoon vanilla extract. Stir gently until cherries are coated (this smells amazing!).
4. Roll Out Dough: Preheat your oven to 375°F (190°C). Roll out one disk of dough on a floured surface to fit a 9-inch pie plate. Place the crust in the plate and trim any excess.
5. Assemble Pie: Pour the cherry filling into the crust and dot with 1 tablespoon butter. Roll out the second disk of dough for the top crust — don’t rush this part! Trim and seal the edges, then cut slits for steam vents.
6. Finish Up: Brush the top crust with a beaten egg and sprinkle with 1 tablespoon granulated sugar. Bake for about 45 minutes or until the crust’s golden-edged and filling is bubbly (you’ll know it’s ready when you see that gorgeous color).
7. Cool Down: Let it cool for at least 30 minutes before slicing; this helps set everything up nicely (trust me on this).
Exact quantities in the recipe card below.
How to Store Baked Fresh Cherry Pie
- Room Temperature: Cover with a clean kitchen towel or place in a cake dome. It’ll last for about 2 days, but the crust starts to lose its crispiness after that.
- Refrigerator: Wrap it tightly in plastic wrap or foil. It can hang out for about 5 days, but keep in mind the crust will get a bit soft (trust me, it’s still tasty though).
- Freezer: For longer storage, wrap it well in plastic wrap and then aluminum foil. It’ll be good for up to 3 months. Just know that the filling might lose some of its fresh taste and texture after thawing.
- Reheating: Pop individual slices in the oven at 350°F (175°C) for about 10-15 minutes until the filling’s bubbly and the crust is crisp again (you’ll hear that nice crackle!).
What to Serve with Baked Fresh Cherry Pie?
This dish is sweet and rich, so pairing it with something cold or tangy helps balance all that sweetness. Here are some great options:
- Vanilla Ice Cream: The creamy texture contrasts beautifully with the flaky crust and tart cherries.
- Whipped Cream: A light dollop adds a fluffy texture that makes every bite feel less heavy.
- Greek Yogurt: The tanginess cuts through the sweetness, plus it’s super easy—just scoop it on top!
- Lemon Sorbet: A refreshing choice that provides a nice temperature contrast while enhancing the cherry flavor.
- Fresh Mint Leaves: Add a sprinkle for a pop of color and an aromatic touch that brightens each slice.
- Coffee: A warm cup balances the pie’s sweetness with its deep, rich flavor. Brew it while the pie cools.
- Fresh Berries: Toss together some raspberries or blueberries for a tart side; they add color and brightness to your plate.
I’d skip anything too heavy like chocolate sauce—let’s keep it light!
Baked Fresh Cherry Pie Variations
Here’s how to play with this recipe and make it your own!
- Almond Extract Twist: Replace the vanilla extract with 1/2 teaspoon almond extract for a nutty flavor boost. Add it with the filling ingredients.
- Cinnamon Sugar Crust: Mix 1 tablespoon of cinnamon with the granulated sugar before sprinkling on top for a warm, cozy spice.
- Lemon Zest Addition: Grate in 1 teaspoon of lemon zest along with the lemon juice in the filling for an extra citrusy kick.
- Oat Topping Upgrade: For a crunchy topping, mix 1/2 cup oats with 2 tablespoons of melted butter and sprinkle on top before baking.
- Mixed Berry Filling: Swap out half the cherries for raspberries or blueberries. Add them when mixing the filling ingredients to mix things up!
- Sour Cherry Swap: Use sour cherries instead of sweet ones if you like that tart punch. Adjust sugar to taste — start with 1/3 cup.
- Double Crust Delight: Roll out both disks and layer them without cutting slits for a gooey, juicy surprise inside — just be ready for extra baking time!
Make Ahead Options for Baked Fresh Cherry Pie
I like to prep the crust and filling for my Baked Fresh Cherry Pie a day in advance. Just make the dough, wrap it in plastic, and store it in the fridge. The cherry filling can also chill overnight in an airtight container. When you’re ready to bake, roll out the dough and assemble everything. Honestly, the crust holds up well, but I wouldn’t recommend pre-baking it; it tends to get soggy before serving. Bake right before you want to enjoy it for that fresh-from-the-oven taste. Trust me on this: serve it warm with ice cream!
Baked Fresh Cherry Pie Recipe FAQs
Can I make Baked Fresh Cherry Pie ahead of time?
Absolutely! You can prepare the filling a day in advance and store it in the fridge. Just make sure to keep the crust dough chilled until you’re ready to roll it out. If you want to bake it later, assemble the pie but don’t brush it with egg or sprinkle sugar until just before baking. That’ll help keep everything fresh and flaky!
What if I can’t find fresh cherries for this recipe?
Honestly, fresh cherries are key for flavor and texture in this dish. If you can’t find them, consider using another fruit like blueberries or peaches instead, but be aware they might need different sugar adjustments. And whatever you do, don’t use frozen cherries—they’ll turn your pie soggy and sad (trust me on this).
Why did my Baked Fresh Cherry Pie turn out soggy?
Soggy pies usually come from not using enough cornstarch or letting the filling sit too long before baking. Make sure you’re adding that 2 tablespoons of cornstarch — it’s crucial for thickening up that juicy filling. Also, once you’ve mixed your cherries with the sugar and lemon juice, get that pie into the oven quickly! You’ll know it’s ready when you see those bubbles peeking through the slits.
Can I use low-fat butter in this recipe?
DO NOT use low-fat butter here; it’ll ruin your crust’s flakiness and richness! Regular unsalted butter gives that melty-gooey goodness we love so much in a pie. The butter’s coldness also helps create those nice layers in the crust. And remember: chilling is your best friend—don’t skip that step!
Final Thoughts on Baked Fresh Cherry Pie
Baked Fresh Cherry Pie is worth making for that flaky crust. Seriously, when you mix cold butter and good flour just right, it turns into a golden, crisp shell that perfectly cradles those juicy cherries. If you’ve been putting this off, tonight’s the night. Just imagine slicing into it and hearing that satisfying crunch while the sweet-tart filling spills out — pure bliss! Drop a comment if you added anything or had any hiccups along the way; I’m always curious to hear your stories!
Baked Fresh Cherry Pie
Ingredients
Method
- In a large bowl, combine the flour and sugar. Add the cold butter and mix until the mixture resembles coarse crumbs.
- Gradually add ice water, mixing until the dough comes together. Divide the dough in half, flatten into disks, wrap in plastic, and refrigerate for at least 1 hour.
- In a mixing bowl, combine the pitted cherries, sugar, cornstarch, lemon juice, and vanilla extract. Stir until the cherries are well coated.
- Preheat the oven to 375°F (190°C). Roll out one disk of dough on a floured surface to fit a 9-inch pie plate. Place the crust in the pie plate, trimming any excess.
- Pour the cherry filling into the crust and dot with butter. Roll out the second disk of dough and place on top. Trim, seal, and cut slits for steam vents.
- Brush the top crust with beaten egg and sprinkle with granulated sugar. Bake in the preheated oven for 45 minutes or until the crust is golden brown and the filling is bubbly.
- Allow the pie to cool for at least 30 minutes before slicing to let the filling set.
- Serve with whipped cream or vanilla ice cream, if desired.